Silkscreen Workshop

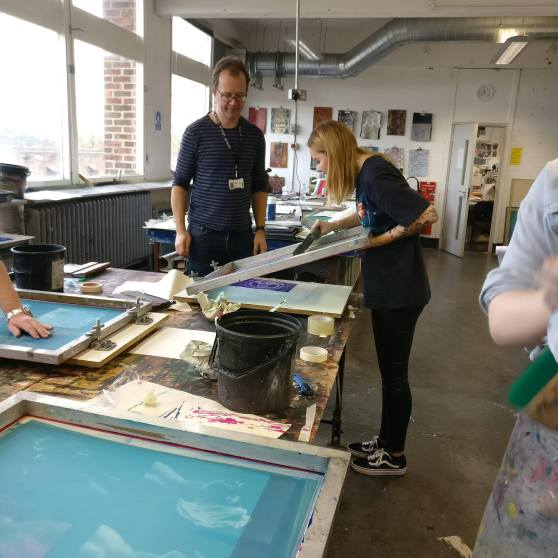
In today’s Workshop we was shown how to use the silkscreen process of printing. Before the workshop we had to prepare our image in Photoshop by splitting up the colour layers and printing them onto acetate. Below is the guide we was given to print out our colour Image.

To Print Cyan

Image – Mode – CMYK color (layers now separated)

Select Channels (next to layer in Dialogue box) – Choose Cyan

Image – Mode Bitmap – Discard Channels – Yes

Resolution – Output – 300dpi – Method – Halftone Screen

Frequency – 30 – Lines per inch

Angle – 15

Shape – Ellipse – Ok

File – Print with preview – Registration marks – Print

Edit – Undo – Until full colour image is back.

Now repeat the Process for the other Channels changing the angle for each Channel as follows –

Cyan – 15

Magenta – 45

Yellow – 75

Black – 75

Below are the images of the colours separation printed onto acetate.

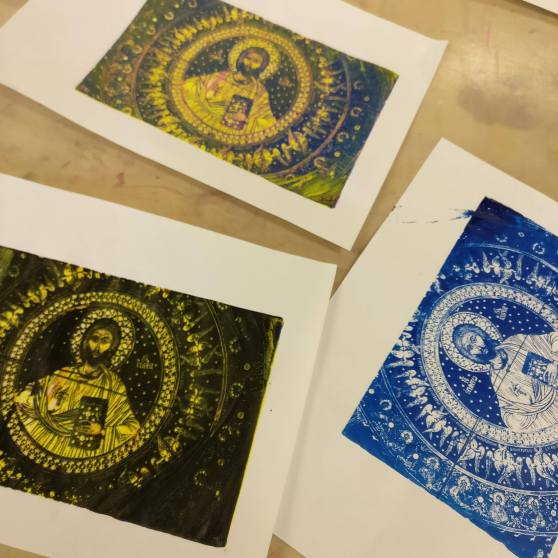
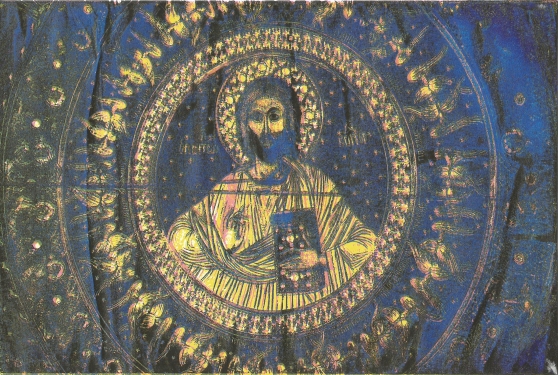
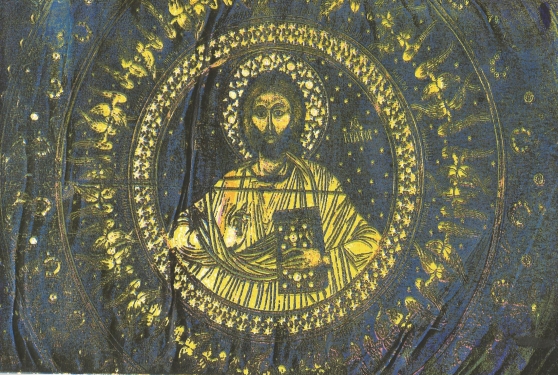
After we printed our images onto acetate, they were given to a technician named Simon who turned our images onto stencils for the workshop. Starting with Cyan, we used acrylic paints and a squeegee (the same colour to match each colour layer of the image) and printed our image, layering each different colour layer on top of each other until all the colours worked together to produce an image. My prints can be seen below.


Location Lighting Workshop

Today we did a location lighting workshop with the new Profoto B2 location kit. This was a fun workshop where we experimented with the equipment inside and outside. It was easy to set up and easy to carry due to it being small and lightweight, some of the photos turned out well, and I have placed them below, I would defiantly think about using this kit on a location set or even buying it myself.

profoto-b2-location-kit-3-1024x529

Cyanotype Workshop

Today we had a cyanotype workshop. I had worked with cyanotype before at my previous school, so it was fun to do this technique again.  Below are some images from the workshop. As you can see, i tried this three times each time changing the amount of time it was under the UV light or with different paper. As you can tell from the photos, the first one turned out the strongest

As an experiment, i thought I would try to see what my acetate images would look like layered onto of the cyanotype. They look good however the colours of the photos are boring compared to the pictures I intended to use. The images look dull and do not attract the viewer at all. It’s a good idea to keep in my mind for future units.


Collage/Appropriation/Animation Workshop

For this workshop, we worked with Collage/Appropriation/Animation. We went to the library and picked out images we wanted to use to make an animation. For this, i based it on tattoos and tattooed people. I enjoyed this workshop. It was fun and easy to do. I think the video has come out really well. I like it when the figures turn around it looks like they are doing it gradually and it looks natural.  the video if this animation is linked below.


Audio Editing Workshop

Here we had an audio editing workshop where we had to place sound over the top of a Video we were given. I had fun doing this and think the sound that I added to the video works well with actions happening in the video. Everything is playing at the right time and sound like part of the video even though it’s not.

Polaroid Workshop

Here we did a workshop using Polaroid’s. For this, we took images on a Polaroid camera. One image black and white the other in colour. We then took these Polaroid’s into the darkroom and cut along the frame of the image, so we were just left with the image. We peeled back to top layer then placed them in boiling water and left it a few minutes till the image started to come away. Once it was separated, it then formed into a delicate fabric. With paint brushes we carefully placed it into cold water onto some acetate and spread it out until the image regained its shape. We then carefully removed it from the water, so the photos didn’t move and left it to dry. We then repeated this the same way with the colour Polaroid image. Below are what the images turned out like, as you can see the black and white images turned out a lot better than the coloured image. This was maybe due to them having different chemicals in them and needed to be in the boiling water for longer. This was an interesting technique that I have learned and did enjoy doing it. However, I didn’t think I will do this method again, as the images didn’t turn out too well.

Collage Workshop

For this workshop, we had to gather images and combine them together making a collage. For this workshop, I used images from my Bulgaria trip. Below is an image of the outcome, overall I’m quite happy with how this has turned out. It looks effective, and the images work really well together.


img_6034.jpg

Liquid Light Workshop

For this workshop, we learned how to use liquid light. As we are using chemicals, we need safety gear. This includes of rubber gloves, apron, and goggles. The Equipment required is developing trays, tongs, nonmetallic brushes, kettle, hairdryer, material to coat, coating area, timer, enlarger or UV bed – negative or acetate, varnish, metal jar or appropriate container to heat liquid light emulsion, thermometer.
preparation for liquid light
Prepare an easel to the size you wish to print. pre-cut your coating material. Set up your enlarger with selected negative. Put on your safety equipment. Mix up the paper developer and fix in the dev trays. Prepare a drying area. Layout equipment for coating the material.
Once you expose your negative to the liquid light, you will need to place it in the developer tray and agitate for 2.5 minutes – no longer. Then put it in the fix for 4 minutes, then wash for 10-20 minutes.
Below is the overall outcome of this process.

Scanned Image


B&W Photograms Workshop

Today we learned how to do b&w photograms in the darkroom. This was a quick and easy technique to learn. It was also an exciting way to take a photo without using a camera.
We started this workshop by picking objects that we wanted to use. I chose a wine glass with a flower inside, string and a bracelet with charms hanging from it. We then set up the enlarger, so it was ready to use. I set my timer for 5 seconds. Then got the photo paper and arranged our objects on top of it. We then pressed the button on the enlarger to come on for our chosen time. We then placed our paper on three different chemicals, dev for 2 or more minutes until the black was prominent, stop for 30 seconds, and fix for 4-5 minutes. After we did them techniques, we then placed it under running water for ten minutes. I did two different photograms altogether and thought they both turned out efficient and robust. Overall I am delighted with how these turned out and would defiantly try this technique again. Below and the results of these photograms.

GIF & Cinemagraph Workshop

For this workshop, we learned how to create a GIF and cinemographs. To do this we had to go out and shoot a moving video, we then came back and opened it into Photoshop where we created new layers and masked the parts we wanted to move and the parts of the image we wanted to keep still. Overall I enjoyed doing this workshop. It was a quick and easy technique to learn that will maybe come in useful in the future. I am also happy with how my cinemograph as turned out, and I think it is effective and makes the viewer wonder what is going on and what the person looks like in the image. The cinemagraph I created is down below. It should play on it own in a couple of seconds.

rebbeca-flipped-final

Shooting Video Workshop

For this workshop, we had to get into groups and go out and shoot for a short video. I didn’t enjoy doing this and found it hard to do. Once we went out and shot the clips to make our video, we then put them together and edited them using Adobe PremierPro. The overall video is linked down below. I don’t like how this video has turned out as it is very jumpy and not steady at all. To make this video better, we should have maybe kept the camera on a tripod.